Software #
This page walks you through installing the required software on the scanner. You’ll need to install a base image on an SD card for the Raspberry Pi, install some utilities and then upload the Arduino’s program through the Pi.
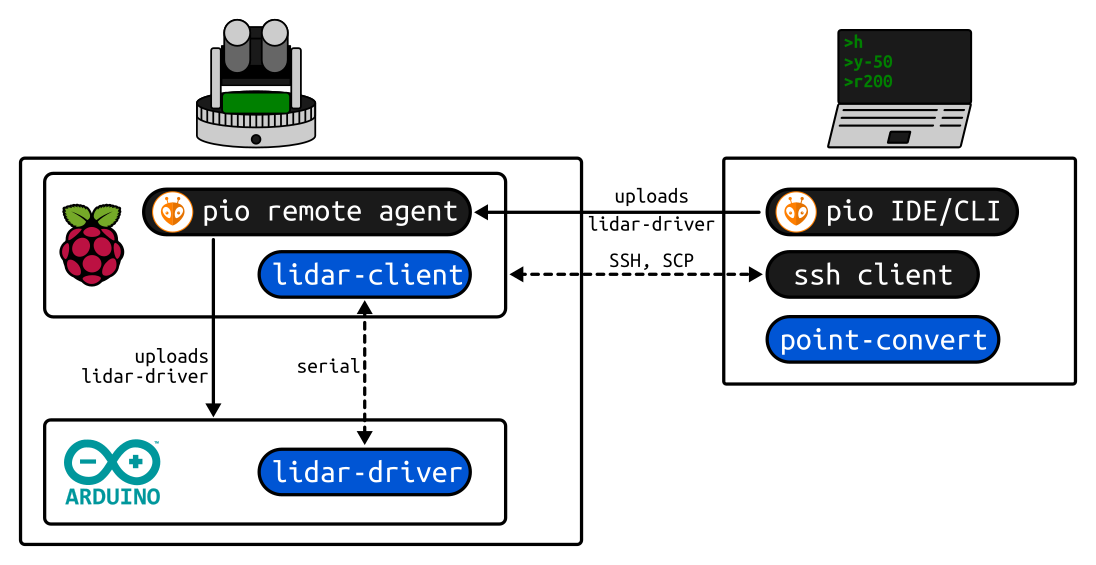
The Pi will be running a
PlatformIO Remote Agent
that lets you upload
lidar-driver on the Arduino from your desktop.
Prerequisites #
PlatformIO on desktop #
You need to have PlatformIO installed on your desktop to be able to upload the program on the Arduino. The rest of this guide assumes you have the CLI (PlatformIO Core) installed, but you should be able do everything using the IDE as well.
SSH client #
Most Linux distributions and Mac OS have SSH clients built-in. On Windows, you could use PuTTY. You’ll need the SSH client to connect to the Raspberry Pi once it has booted up.
Raspberry Pi base image #
You need to install a base Raspberry Pi OS image on a micro-SD card first. I recommend using the 3dasd base image from here.
What’s in the 3dasd base image?
At the moment the 3dasd base image only extends the official Raspbian base image with an installation of the PlatformIO Remote Agent which is required for uploading the software running on the Arduino.You could also start from scratch or build on top of your own image. Check out this repo that documents (and automates) the creation of the 3dasd base image.
See the instructions here under Writing the image for installing the image on an SD card.
Customizing your Pi #
Once you have the base image on the SD card, it’s time to make it your own by customizing it a bit.
WiFi setup #
You need to add your WiFi network to /etc/wpa_supplicant/wpa_supplicant.conf
on the root partition to let the Pi connect to your network. See instructions
here.
Add your SSH public key #
Password login is disabled by default so you need to add your SSH public key to the Pi’s SD card first.
If you don’t have an SSH keypair, you’ll need to generate one first. On
Linux/Mac OS you need to invoke ssh-keygen from a terminal. If you’re running
PuTTY on Windows,
this guide
should help.
Open the /home/pi/.ssh/authorized_keys file from the SD card’s root partition
and paste your public key (from ~/.ssh/id_rsa.pub on Linux/Mac OS; see the
guide above for Windows instructions).
Add your PlatformIO token #
To let PlatformIO connect from your desktop to the Pi, you need to add your
PlatformIO account token to /etc/systemd/system/pio-remote.service on the root
partition.
Run the following on your desktop to obtain your token:
# 1) Register (skip if you already have a PlatformIO account)
pio account register
# 2) Login
pio account login
# 3) Show the token
pio account token
Copy the token from the last command’s output. Edit /etc/systemd/system/pio-remote.service
to replace YOUR-TOKEN with the actual token.
First boot #
Once you’re done with the customization steps from above, you can unmount/eject the SD card, insert it into the Raspberry Pi and power up the scanner.
IP address #
Once the Pi boots up it should automatically connect to the WiFi network that you’ve specified above. To be able to access it from other devices (e.g. your desktop computer) on the same network, you need to figure out its IP address first. See this guide for instructions.
SSH access #
Once you have the IP address, you can connect with PuTTY on Windows or with
ssh on Linux/Mac OS:
ssh pi@YOUR-PI-IP
Enable PlatformIO Remote Agent #
Once connected via SSH, enable and start the PlatformIO systemd service with
the following:
sudo systemctl enable pio-remote && sudo systemctl start pio-remote
You can verify that the service has started with:
systemctl status pio-remote
You should see a green active (running) status and the logs should end with
[info] Successfully authorized.
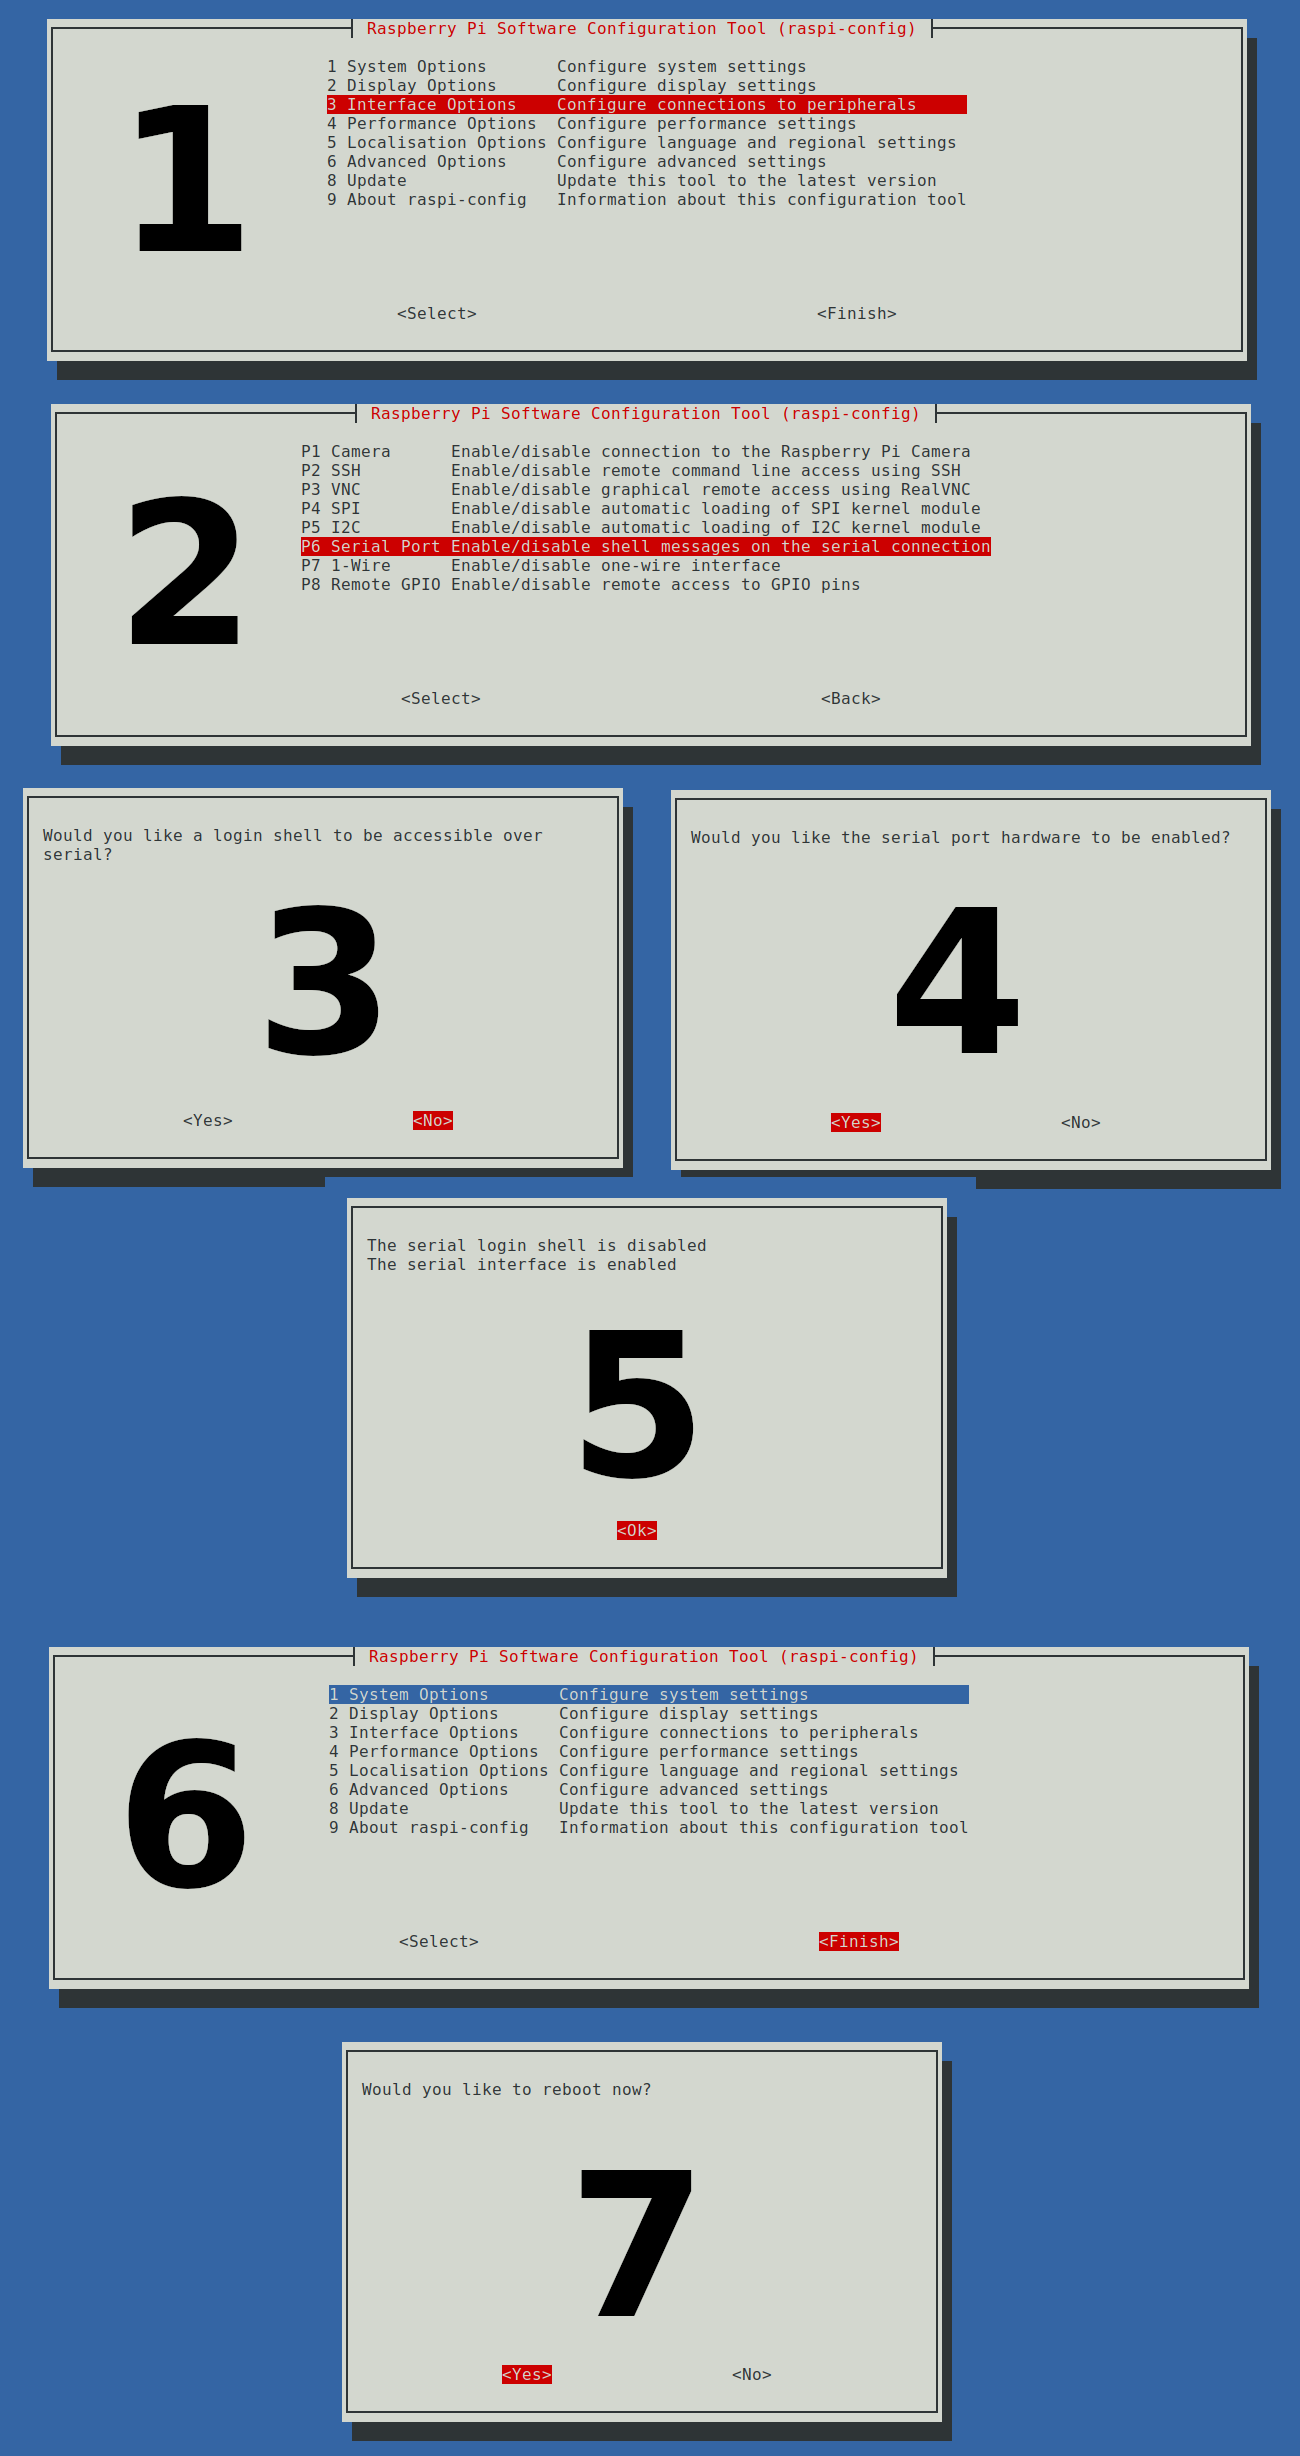
Enable serial port #
To enable the serial port where the Pi will reach the Arduino, run
sudo raspi-config
Choose Interface Options and then Serial Port. Say No to the login shell
question and Yes to enabling the serial port hardware. Exit with the Finish
button and let it reboot.
Upload lidar-driver to Arduino #
Clone or download the lidar-driver repo on your desktop and run the following:
# PlatformIO login (skip if you're already logged in)
pio account login
# List remote agent (your scanner's Raspberry Pi should show up)
pio remote agent list
# Upload lidar-driver
cd lidar-driver/
pio remote run --target upload
Once the upload completes you should see the green LED blinking every two seconds on the scanner indicating that it’s running and ready.
Run lidar-client #
Download lidar-client on the raspberry with the following:
wget https://github.com/3dasd/lidar-client/releases/download/v0.1.2/lidar-client_0.1.2_linux_armv5.tar.gz -O lidar-client.tar.gz
tar xzf lidar-client.tar.gz lidar-client
rm lidar-client.tar.gz
You can launch the client with
./lidar-client
Time to try some commands to see if everything works! Every command is a single character optionally followed immediately by a number. Try the following to move the scanner around:
x100
x-100
y50
y-50
The most important command to remember is s that immediately stops whatever
the scanner is doing.
To exit the client, hit Ctrl+C. For more information on how to use the scanner
see Usage.
Congratulations!
At this point you should have a working 3D scanner! I’m sure you’ve experienced some hiccups along the way, please share your feedback! Get in touch!